How a College Student Built a Slackbot to Execute Trades In a Day, Part 1
Hi, I’m Andrew, an intern at Alpaca from Northwestern! As a college student curious about both tech and financial spaces, I was able to leverage Alpaca’s trading API service to open up a large number of application possibilities. Here, I wanted to share a small project that I worked on this summer.

Chinese tariffs. Tesla to 420. Trump tweets. With so much unpredictability in the markets these days, one short look away from the market could take a toll on your portfolio. Unfortunately, the market does not wait for people to get off work to become volatile. In fact, much of the volatility can happen during the workday, while people are busy in meetings or trying to get work done. Luckily for you, there’s a way to stay working while also being able to make crucial trades that could save your portfolio from being Lehman 2.0.
Wouldn’t it be great if you could trade quickly, pretending you are working? Or trade without leaving the chat with your coworkers?
Alpaca makes this a reality thanks to its simple API. Using a Slack app, I integrated a Slackbot with my Alpaca account so that I can make a simple market order from any Slack channel of my choosing. This article will detail how I created the Slackbot, from start to finish.
Spec
Here is what I decided to do:
- Written in Python
- Handles a slash command
/order - Submits a market order for my account with specified symbol and quantity
Simple, yet it gets the job done! Now that we have a plan for a great MVP, let’s jump in and start building the Slackbot.
Create the Slack App
I’ll start from creating the Slack app. Go here and click the “Create New App” button. After you enter a name and select the workspace you’d like to install in, you’ll be greeted with a screen similar to this:
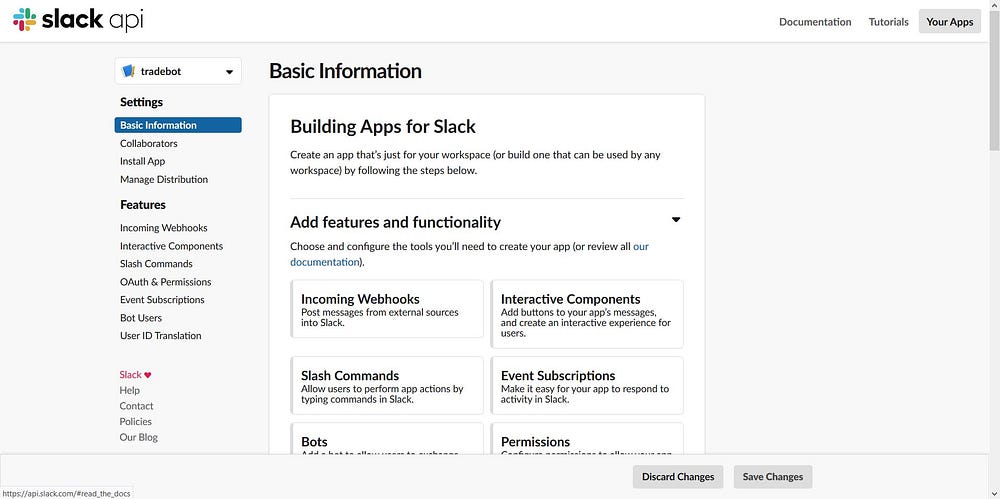
There are a couple of steps to set up this app first.
Add Bot Users
First, go to “Bot Users” on the left column and click “Add a Bot User”. This will give you a bot that you can interact with in your channel.
Add Slash Command
For this step, you’ll need a URL publicly accessible from Slack. While developing in local, ngrok is a recommended tool to publish your localhost web server to the rest of world. Assuming you’ve added ngrok to your path variables, you can run the command:
$ ngrok http 3000
This will expose your local flask server via the randomly assigned URL (which looks like: https://<alphanumerics>.ngrok.io ). You will use this in the next step. Note, this URL changes when you restart the ngrok process if you are a free tier, so make sure to update the registered URL every time.
Configure the Command
Navigate to the “Slash Commands” section and click create new command. You should be greeted with this page:
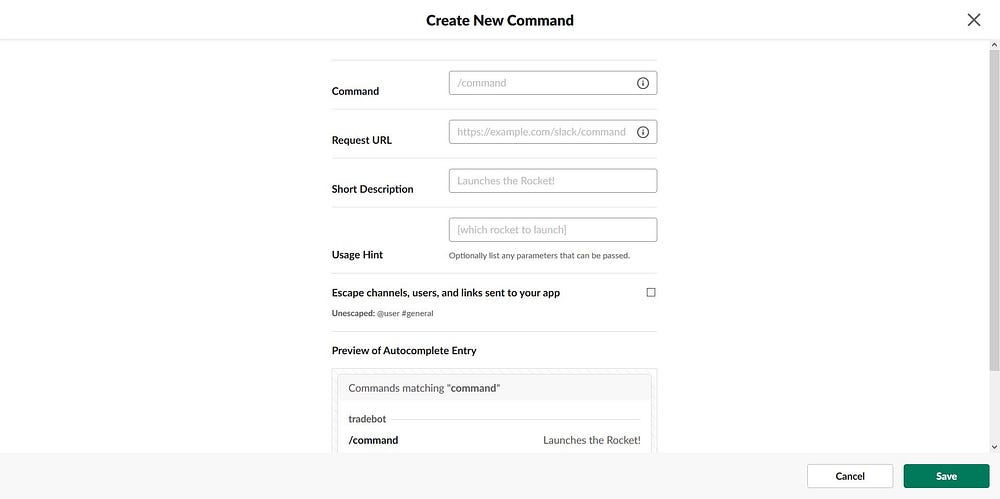
This is where you create your command. Input as follows.
- Command:
/order - Request URL:
https://<the ngrok host>/order - Short Description: “Executes order of specified type.”
- Usage Hint: “ <time_in_force>”
Each entry is pretty straightforward, but see Slack API document for more details.
OAuth and Permission
Now go to “OAuth & Permissions” and scroll down to the “Scopes” section. You’ll need to add the following scopes to your app:
- Send messages as Alpaca Tradebot (chat:write:bot)
- Post to specific channels in Slack (incoming-webhook)
- Add slash commands and add actions to messages (and view related content) (commands)
Once you add these permissions, scroll up to the top of the “OAuth & Permissions” page and click the “Install App to Workspace” button. Grant access in the next screen and select the channel for this command. Then, you’ll be presented with your OAuth access token. Save this token as you will paste it in the code later.
Environment Setup
Before start coding, make sure to install the Alpaca Python SDK, found here, and Flask. To install them, just run this command (assuming you have pip installed):
$ pip3 install alpaca-trade-api Flask
The Code
Finally, coding! At the top of the script, we’ll need to import some packages and declare some constants, shown below:
from flask import Flask, request
import alpaca_trade_api as tradeapi
import requests
import asyncio
import json
import os

# Constants used throughout the script (names are self-explanatory)
WRONG_NUM_ARGS = "ERROR: Incorrect amount of args. Action did not complete."
BAD_ARGS = "ERROR: Request error. Action did not complete."
KEY_ID = "" # Your API Key ID
SECRET_KEY = "" # Your Secret Key
SLACK_TOKEN = "" # Slack OAuth Access Token

config = {
  "key_id": os.environ.get("KEY_ID", KEY_ID),
  "secret_key": os.environ.get("SECRET_KEY", SECRET_KEY),
  "base_url": os.environ.get("BASE_URL", "https://paper-api.alpaca.markets"),
  "slack_token": os.environ.get("SLACK_TOKEN", SLACK_TOKEN),
}

api = tradeapi.REST(
  key_id=config.get('key_id'),
  secret_key=config.get('secret_key'),
  base_url=config.get('base_url'),
)

# Initialize the Flask object which will be used to handle HTTP requests
# from Slack
app = Flask(__name__)

def reply_private(request, text):
  requests.post(
  url=request.form.get("response_url"),
  data=json.dumps({"text": text}),
  headers={"Content-type": "application/json"},
)
You can pretty much leave everything alone except some of the constants. The constant SLACK_TOKEN is where you put your Slack OAuth token from the last step. KEY_ID and SECRET_KEY is where you enter your Alpaca API key. If your keys are for a live account rather than paper, you’ll also have to change the base_url to the live endpoint.
Next, we add the entry point where we receive the slash command message.
@app.route("/order", methods=["POST"])
def order_handler():
  '''Execute an order. Must contain 5 arguments: type, symbol,
  quantity, side, time in force
  '''
  args = request.form.get("text").split(" ")
  if len(args) == 0:
    return WRONG_NUM_ARGS
Preceding the function is the Flask decorator, which basically converts the function into a listener function for an HTTP request with the route “/order”, which also is the end of the HTTP Request URL that we created earlier. After the decorator, the function grabs the arguments from the request so that we can work with them and plug them into our order.
async def sub_order(api, request, args):
  order_type = args[0].lower()
  if order_type == "market":
    if len(args) < 5:
      reply_private(request, WRONG_NUM_ARGS)
      return
    try:
      side = args[1]
      qty = args[2]
      symbol = args[3].upper()
      tif = args[4].lower()
      order = api.submit_order(symbol,
                               side=side,
                               type=order_type,
                               qty=qty,
                               time_in_force=tif)
      price = api.get_barset(symbol, 'minute', 1)[symbol][0].c
      text = (f'Market order of | {side} {qty} {symbol} {tif} |, '
              f'current equity price at {price}. '
              f'Order id = {order.id}.')
      requests.post(
        url="https://slack.com/api/chat.postMessage",
        data={
          "token": config["slack_token"],
          "channel": request.form.get("channel_id"),
          "text": text})
    except Exception as e:
      reply_private(request, f"ERROR: {str(e)}")
  else:
    reply_private(request, BAD_ARGS)
Next, we are going to create a sub-function (which goes inside order_handler() ) to send the order asynchronously. The sub-function checks that all the arguments are present, then tries to send an order with type based off the first parameter (for this article, we’re only allowing market orders). If anything fails, we’ll get an error message in the the Slack channel.
  asyncio.run(sub_order(api, request, args))
  return ""

# Run on local port 3000
if __name__ == "__main__":
  app.run(port=3000)
Finally, at the end of the function, we run asynchronously run the sub-function and return from the handler so that Slack gets an immediate response from our script. Outside the function, we set up the app to run on a local port.
This example is available for you to try in GitHub today.
Run It!
Assuming you have your ngrok server running, navigate to the directory where the script is and run:
python tradebot.py
This will start running your script. Now, your Slackbot should be ready for use. Go to the channel where the Slackbot is installed and try the command /order . There should be an auto-fill option for the command, where you can see the command, description, and usage hint you set earlier. Once type the entire command and the appropriate arguments, you should get a response in the same channel.
If you get a response, you’re all set! Check your dashboard and the order should be there  You now should be able to make trades from your Slack channel.
In this article, I showed how I created a slack app that supports /order command and implemented the command handler that submits order to Alpaca API. Now I can buy and sell some stocks from Slack!
Next Steps
This is the first installment of a 3-part series detailing how to create a robust Slack app. Follow Alpaca’s social media channels to get an update on the next installment, which will show you how to add more complicated functionality to your Slackbot.
Consider testing a strategy in paper trading to see if and how it works before trying it in a live brokerage account.
There are risks unique to automated trading algorithms that you should know about and plan for. You should setup a method or system of continuous monitoring or alerting to let you know if there is a mechanical failure, such as connectivity issues, power loss, a computer crash, or system quirk. You should also monitor for instances where your automated trading system experiences anomalies that could result in errant, missing, or duplicated orders.
Technology and services are offered by AlpacaDB, Inc. Brokerage services are provided by Alpaca Securities LLC, member FINRA/SIPC. Alpaca Securities LLC is a wholly-owned subsidiary of AlpacaDB, Inc.